
Ever since I have kids, preparing meals has been a challenging yet pleasurable task for me. "No processed food, not too much salt, not too much sugar, no artificial colouring, no instant noodle, must include superfoods, must be tasty...", these are the few rules I goes by.
Even tho' I try hard to stick to my rules, there were also days which i called them CHEAT-DAY, that my kids will eat the "not-so-healthy" foods.
One of the food which I've been guiltily giving to them (occasionally) is sausage. We all know that sausage is a processed food and who knows exactly what they put in them. I'm guilty as charged!

But now, I don't need to feel guilty anymore with these healthy homemade sausages. And best of all, my kids love them!
 These are plain chicken sausages with minimal herbs. I've added additional onion and garlic to helps boost immune system, and it helps to flavor the patty as well.

Yummy in my tummy!
 I'm so happy with the outcome of these sausages. It's moist and flavorful. Next, I'm going to try mushroom or cheese sausages. Can't wait!
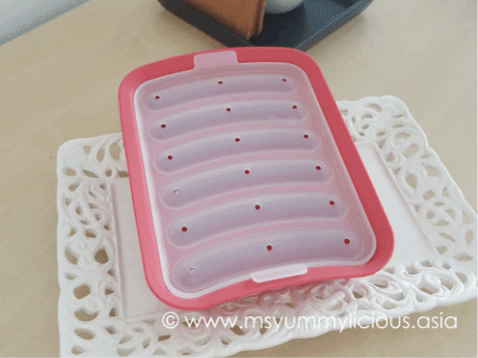 Yes, this is the MASTER behind my homemade sausages. This silicone mold is made of durable food grade silicone. The non-stick feature makes it easy to push out the sausages while maintaining its shape. You can also bake cake or biscuits with this mold. It is able to withstand temperature from -40°F to 450°F, making it oven safe, freezer safe & dishwasher safe.


 First Commenter...(+/-)
Even tho' I try hard to stick to my rules, there were also days which i called them CHEAT-DAY, that my kids will eat the "not-so-healthy" foods.
One of the food which I've been guiltily giving to them (occasionally) is sausage. We all know that sausage is a processed food and who knows exactly what they put in them. I'm guilty as charged!

But now, I don't need to feel guilty anymore with these healthy homemade sausages. And best of all, my kids love them!


Yummy in my tummy!

HOMEMADE CHICKEN SAUSAGE (WITH SILICONE MOLD)
 Prep Time : 35 mins
Cook Time : 15 mins
Total Time : 50 mins (+30 mins for chilling & cooling)
Makes : 6 sausages
Ingredients:
Base
250g minced chicken breast (95% meat, 5% skin)
1 egg
5 Tbsp corn starch
1 - 2 Tbsp water (as needed)
3/4 tsp salt
A pinch of black pepper
Flavor
1/2 onion
1 garlic
1/2 tsp oregano/ rosemary
Directions:
1. Blend onion and garlic into fine paste. Onto a chopping board, place minced chicken breast and blended onion garlic paste. Using a butcher knife, repeatedly chopped the mixture until it becomes a sticky patty.
2. Transfer the sticky patty into a bowl and add in the rest of the ingredients. Stir to combined well, hitting the patty against the inner bowl a few times to get a springy texture.
3. Chill in refrigerator for 20 minutes. Coat the silicone mold with vegetable oil and arrange the patty into each cavities. Press to fill up and cover each cavities.
 4. Close the lid and press along the white dotted line to get the excess patty out. This is to ensure that you get the most perfect shape. (See photo left).
5. Steam the chicken patty (together with mold) for 10 minutes. Or put in microwave for 2-3 minutes on high (*). Let it cool before unmolding them.
6. Pan-fried or bake them, whichever way you prefer. Enjoy!
Notes:
● If you have a food processor, blitz chicken breast, onion and garlic until it becomes a sticky patty. Continue on to Step 2.
● Alternatively, you may add the blended onion garlic paste, minced chicken and the rest of the ingredients into a bowl and stir well until it becomes a sticky patty, hitting the patty against the inner bowl a few times to get a springy texture. Continue on to Step 3.
● To get a perfect shape, refer to Step no.4.
● For storage, you may keep the sausages in freezer for 1 - 3 months.
(*) Each microwave has different watt setting, please adjust timing accordingly. The patty should be able to slide out from the mold. If it's sticky, microwave for longer period.
 #msyummyliciousrecipe
Make this recipe? Don't forget to snap a photo of it and tag #msyummyliciousrecipe on social media! I would love to see them! Enjoy my recipe!

Cook Time : 15 mins
Total Time : 50 mins (+30 mins for chilling & cooling)
Makes : 6 sausages
Ingredients:
Base
250g minced chicken breast (95% meat, 5% skin)
1 egg
5 Tbsp corn starch
1 - 2 Tbsp water (as needed)
3/4 tsp salt
A pinch of black pepper
Flavor
1/2 onion
1 garlic
1/2 tsp oregano/ rosemary
Directions:
1. Blend onion and garlic into fine paste. Onto a chopping board, place minced chicken breast and blended onion garlic paste. Using a butcher knife, repeatedly chopped the mixture until it becomes a sticky patty.
2. Transfer the sticky patty into a bowl and add in the rest of the ingredients. Stir to combined well, hitting the patty against the inner bowl a few times to get a springy texture.
3. Chill in refrigerator for 20 minutes. Coat the silicone mold with vegetable oil and arrange the patty into each cavities. Press to fill up and cover each cavities.

5. Steam the chicken patty (together with mold) for 10 minutes. Or put in microwave for 2-3 minutes on high (*). Let it cool before unmolding them.
6. Pan-fried or bake them, whichever way you prefer. Enjoy!
Notes:
● If you have a food processor, blitz chicken breast, onion and garlic until it becomes a sticky patty. Continue on to Step 2.
● Alternatively, you may add the blended onion garlic paste, minced chicken and the rest of the ingredients into a bowl and stir well until it becomes a sticky patty, hitting the patty against the inner bowl a few times to get a springy texture. Continue on to Step 3.
● To get a perfect shape, refer to Step no.4.
● For storage, you may keep the sausages in freezer for 1 - 3 months.
(*) Each microwave has different watt setting, please adjust timing accordingly. The patty should be able to slide out from the mold. If it's sticky, microwave for longer period.
Make this recipe? Don't forget to snap a photo of it and tag #msyummyliciousrecipe on social media! I would love to see them! Enjoy my recipe!
First Commenter...(+/-) 


 click here for recipes from my first collection - A Great Pleasure... (+/-)


.....